How to Fit Contract 28 Heavy Duty Adjustable L Brackets for 28mm Curtain Poles

A robust curtain pole installation starts with the bracket. The pole, rings and finials might be the more visible parts of the finished window dressing, but it is the bracket fixing that determines how securely the system performs over time.
The Contract 28 Heavy Duty Adjustable L Bracket has been developed for when you need a stronger, more flexible fixing option for 28mm curtain poles. It was designed to give you greater control over projection while providing dependable support for medium-to-heavy weight curtains and is suitable for fitting onto a timber batten.
In this guide, we explain how to position, mark, drill, adjust and secure the bracket correctly so your curtain pole installation is level, reliable and professionally finished.
When Should You Use an Adjustable Curtain Pole Bracket?
An adjustable curtain pole bracket should be used when a standard fixed bracket does not give enough clearance between the curtain pole and the wall.
This is often the case when curtains need to fall neatly in front of a deep windowsill, radiator, projecting window handle or timber batten. Setting the curtain pole further forward can also help heavier curtains hang and draw more smoothly, particularly where fabric bulk or lining creates a deeper stack.
The Contract 28 Heavy Duty Adjustable L Bracket is the stronger choice when you need both projection adjustment and robust wall support. Unlike a regular L-bracket, the diagonal support arm adds rigidity and extra support, making it well suited to commercial curtain pole installations where strength, repeatability and reliability matter.
tools you will need
Before fitting your curtain pole brackets, prepare the correct tools for the wall type and project conditions.
You will typically need:
- Tape measure
- Pencil
- Spirit level
- Drill
- Screwdriver
- Appropriate wall plugs or fixings
The supplied curtain pole fitting instruction sheet recommends using a drill, spirit level, screwdriver, pencil and tape measure, and also highlights marking the exact screw-hole positions before drilling. External fitting guidance also recommends checking for pipes or cables and using suitable fixings for the wall type before fitting curtain pole brackets.
Before You Start: Check the Wall and Substrate
A heavy-duty curtain pole bracket is only as strong as the surface it is fixed into. Before marking your bracket positions, check the wall, batten or substrate carefully.
For masonry walls, use the correct masonry drill bit and suitable plugs. For timber battens, drill pilot holes and use appropriate wood screws. For plasterboard or stud walls, use fixings specifically designed for the substrate and curtain weight.
For commercial curtain pole installations, particularly in hotels, student accommodation, build-to-rent, healthcare or contract interiors, always confirm the fixing method against the project specification. Where heavy curtains are being installed, the fixing must be suitable for the load.
Step 1: Decide the Curtain Pole Position
As a general starting point, curtain pole brackets are often positioned around 10cm above and 10cm outside the window frame.
For the best result, adjust this position to suit the installation. Consider:
- Curtain heading style
- Finished curtain drop
- Curtain stack-back
- Windowsill depth (if relevant)
- Finial length
- Ceiling height
- Any obstructions around the window
If the curtain pole is fitted too close to the window opening, the curtains may block too much light when open. If the pole is fitted too low, the finished dressing may look compressed. A well-positioned curtain pole should give enough height, width and projection for the curtain to operate cleanly.
Step 2: Set the Bracket Projection
Before final fixing, set the projection on each bracket.
| Measurement | Adjustment |
|---|---|
| Overall wall projection | 110mm-145mm |
| Projection to centre of bracket | 90mm-125mm |
Use the same projection setting across all brackets on the same curtain pole unless the project specification requires otherwise. This ensures the pole runs parallel to the wall and avoids twist or strain once the pole is secured.
Increase the projection so the curtains can hang clear if you’re dealing with deeper windowsills, timber battens or projecting obstructions. For tighter installations, reduce the projection while still allowing enough space for the curtain fabric to move freely.
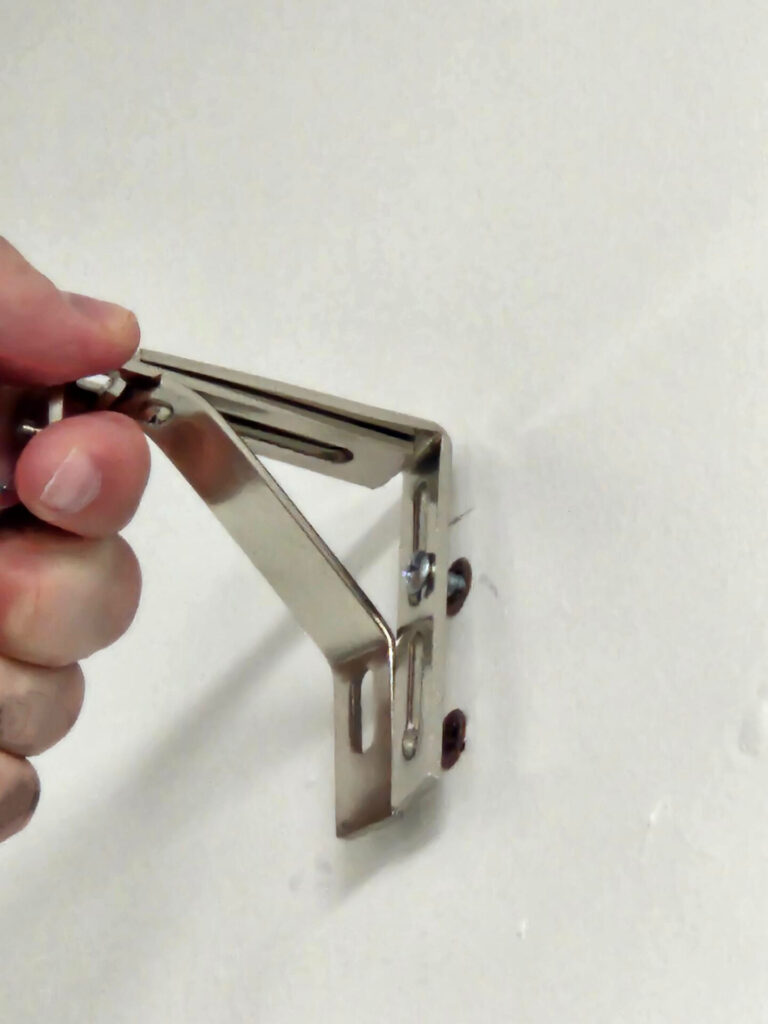
Step 3: Mark the Bracket Positions
Hold the first bracket in position and mark through the screw holes with a pencil. Make sure the bracket is the correct way up, the diagonal support arm is correctly orientated, and the cup or pole support is level.
Repeat the process on the opposite side of the window. Use a spirit level to ensure both brackets sit at the same height. For longer curtain poles, mark the centre bracket at the midpoint, checking that all bracket positions align.
External bracket-fitting guidance follows the same principle: place the bracket at the marked position, check alignment, mark through the screw holes, then remove the bracket before drilling.
Step 3: Mark the Bracket Positions
Drill at the marked positions.

For masonry, use a suitable masonry bit and insert wall plugs flush with the wall. For timber battens, drill pilot holes first. For plasterboard or hollow walls, use specialist fixings suitable for the curtain pole weight and the project conditions.

step 5: secure the bracket
Align the bracket with the drilled holes, insert the screws and tighten gradually. Do not fully load the bracket until all fixings are secure. For best practice, tighten each screw evenly so the bracket sits flat against the wall or batten. Check that the diagonal support arm is firm and that the adjustable section is locked in position.


Once fitted, repeat the process for the remaining bracket(s). Stand back and visually check that the brackets are level, equally projected and aligned across the window.
Step 6: Test Fit the Curtain Pole
Place the 28mm curtain pole into the brackets before hanging the curtains. This way, you can check the alignment, projection and overall appearance without the added curtain weight.
Check that:
- The pole sits level
- The pole is centred over the window
- The projection is consistent
- The bracket fixings remain firm
- The curtain pole clears windowsills, handles and obstructions
- The pole is properly secured to the brackets

Step 7: Complete the Final Load Check
Once the curtain pole is fitted, apply a light manual check before hanging the curtains. The bracket should not move, flex away from the wall or pull against the fixing.
After the curtains are hung, draw them open and closed to check for smooth operation. If there is any movement at the bracket, remove the load and review the fixing method before continuing.
For medium-to-heavy curtains, this final check is essential. A heavy-duty curtain pole bracket should provide secure support, but the wall fixing and substrate must be suitable for the load.
Common Curtain Pole Bracket Installation Mistakes to Avoid
Fitting into a weak substrate
Even the strongest bracket cannot compensate for poor fixings. Always match the fixing to the wall type and curtain weight.
Forgetting the projection
Adjustable curtain pole brackets should be set before final tightening. If the projections differ, the pole may sit out of line.
Placing brackets too close to the window
Allow enough width for curtain stack-back. A curtain pole fitted wider than the frame helps curtains clear more of the glass when open.
Missing the centre bracket on longer poles
Longer curtain poles need additional support. As a guideline, use a centre bracket from 240cm pole length upwards.
Loading the pole too soon
Always test the brackets and curtain pole before hanging curtains, especially with heavier fabrics or commercial installations.


